AI summary
This article provides a comprehensive guide on installing Ubuntu with Software RAID 1, which employs disk mirroring to enhance data reliability by writing data to two physical drives simultaneously. It emphasizes the advantages of Software RAID 1, such as simplicity, transparency, and hardware independence, making it a preferred choice for dedicated servers and bare-metal environments.
The guide details the installation process, including prerequisites, planning the disk layout, and configuring RAID during installation. It highlights the importance of correct GRUB installation for boot reliability and outlines steps for verifying RAID health post-installation. Additionally, it discusses the implications of disk failures and the procedures for replacing failed disks while maintaining system availability.
Overall, the article underscores that while Software RAID 1 significantly improves system uptime and reliability, it does not serve as a complete data protection strategy, necessitating regular backups. It concludes by comparing Software RAID 1 with other options, such as Hardware RAID and cloud storage solutions, to guide users in making informed decisions based on their specific needs.
How to Install Ubuntu with Software RAID 1?
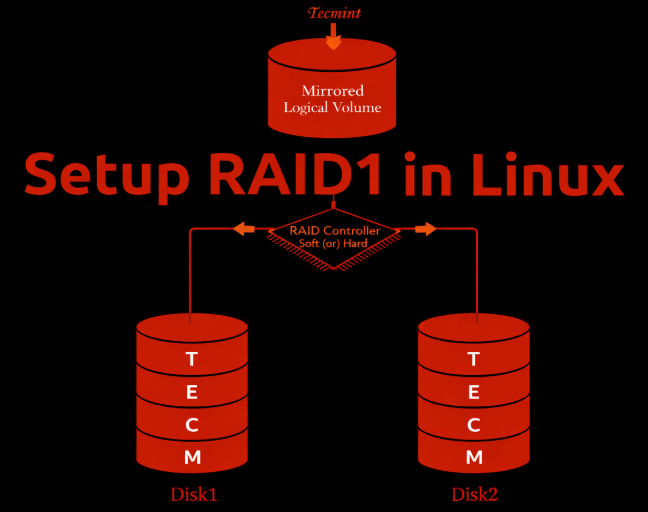
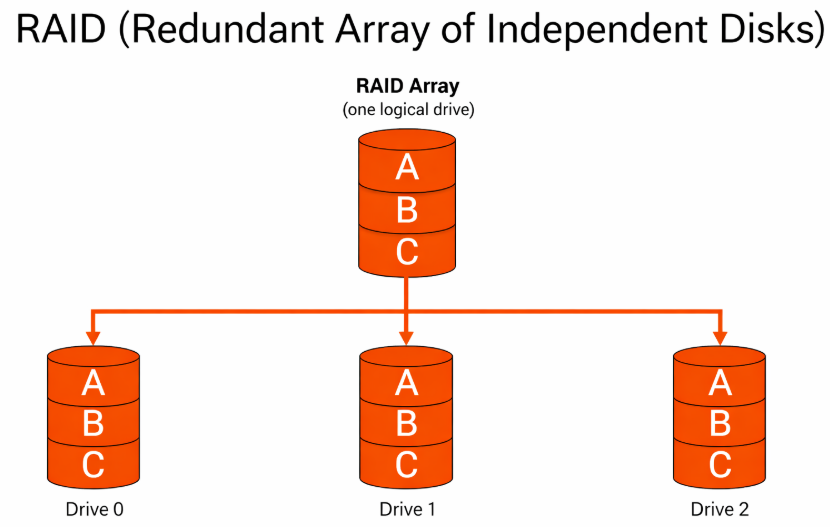
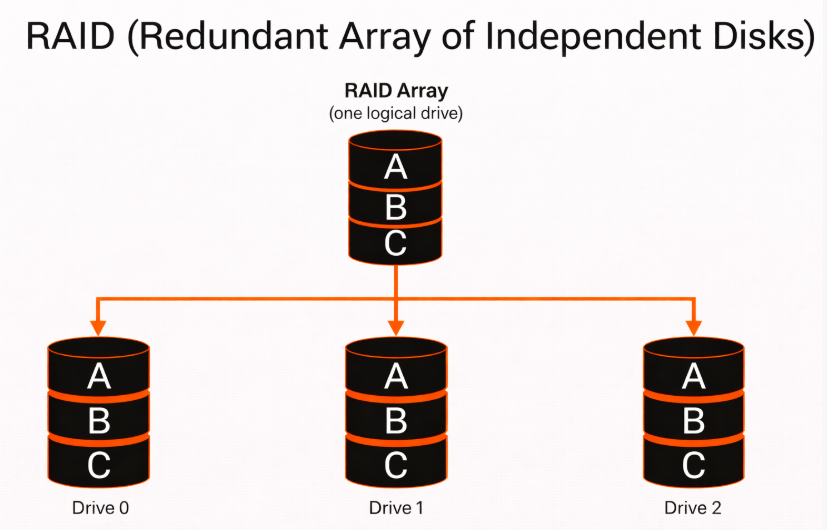
Software RAID 1 utilizes disk mirroring to write data simultaneously to two physical drives. If one drive fails, the system continues operating from the remaining drive without data loss or downtime.
Despite the growth of cloud platforms and hardware RAID controllers, Software RAID 1 remains widely used because it is:
- Simple and transparent — managed directly by the operating system
- Hardware-agnostic — no dependency on proprietary RAID controllers
- Predictable — consistent behavior across environments
- Battle-tested — used for decades in production Linux systems
For system disks, Software RAID 1 offers an optimal balance between reliability and operational simplicity, which is why it continues to be a standard choice in dedicated and bare-metal environments.
When Software RAID Makes Sense on Dedicated Servers?
Software RAID is particularly well-suited for dedicated servers and bare-metal infrastructure, where the operating system has full control over disks.
It is commonly used when:
- The server does not include a hardware RAID controller
- Transparency and portability are more important than abstraction
- Predictable performance and failure behavior are required
- Long-lived infrastructure is preferred over short-term instances
On dedicated servers, Software RAID allows engineers to see, monitor, and control every layer from physical disks to the filesystem without hidden failure modes.
This makes Software RAID 1 a practical and reliable choice for:
- Production system disks
- Infrastructure nodes
- Hosting environments where uptime matters more than maximum write performance
What Does This Guide Cover?
This guide focuses not only on how to enable Software RAID 1 during installation, but also on how to do it correctly for real-world use.
You will learn:
- How to install Ubuntu with Software RAID 1 using manual disk layout
- How RAID devices (md) are created and used by the OS
- How to structure /boot, swap, and/or reliability
- What to verify before finishing installation
- Which decisions affect long-term stability and recovery
The goal is not just a working installation, but a fault-tolerant system disk layout suitable for production servers.
Prerequisites and Planning
Before starting the installation, it’s important to plan the RAID layout correctly. Most problems with Software RAID are not caused by the technology itself, but by poor preparation at this stage.
Hardware Requirements
Software RAID 1 relies on having two independent physical disks. These disks should be as similar as possible to avoid capacity and performance issues.
Recommended requirements:
- Two identical drives (same size and type)
- HDD, SSD, or NVMe
- HDD, SSD, or NVMe
- Drives connected directly to the system (no USB, no shared storage)
- Stable power delivery (dual PSU recommended on servers)
- BIOS or UEFI access available
If disks differ in size, the RAID array will be limited to the smallest disk, wasting capacity.
What You Need to Know
Ubuntu supports Software RAID on both legacy BIOS and UEFI systems, but the boot process differs.
Key considerations:
- BIOS systems typically use a traditional /boot partition
- UEFI systems require an EFI System Partition (ESP)
- GRUB must be installed on both disks to ensure bootability after a disk failure
Failing to account for the boot mode is one of the most common reasons RAID systems fail to boot after a disk loss.
Planning the Disk Layout
A clear disk layout ensures predictable behavior during failures and simplifies maintenance.
A common and reliable layout for Software RAID 1:
- /boot – small partition, mirrored
- swap – optional mirroring, depending on use case
- / (root) – mirrored RAID array with remaining space
Important planning rules:
- All RAID partitions must be created before formatting
- Partition sizes must be identical on both disks
- Filesystems are created on RAID devices (/dev/md*), not on raw disks
This approach keeps the system simple, transparent, and easy to recover.
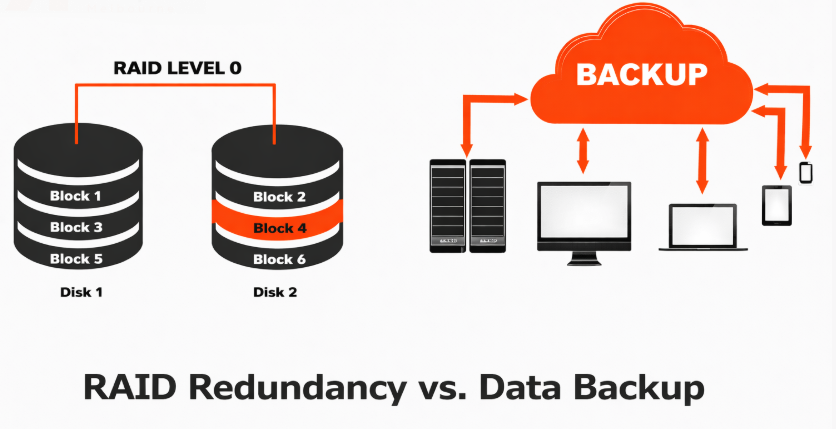
What Software RAID 1 Does and Does Not Protect Against?
Software RAID 1 protects against physical disk failure, but it is not a complete data protection strategy.
RAID 1 protects against:
- Single-disk hardware failure
- Read errors from failing drives
- Downtime caused by disk replacement
RAID 1 does not protect against:
- Accidental file deletion
- Filesystem corruption
- Malware or ransomware
- Administrative mistakes
RAID improves availability backups ensure recoverability.
Checklist Before You Start
Before proceeding to installation, confirm that:
- Both disks are detected by the installer
- Disk sizes and models match
- Boot mode (BIOS or UEFI) is known
- You understand which partitions will be mirrored
- No automatic disk layout will be used
Once these prerequisites are met, you can safely move on to configuring Software RAID during installation.
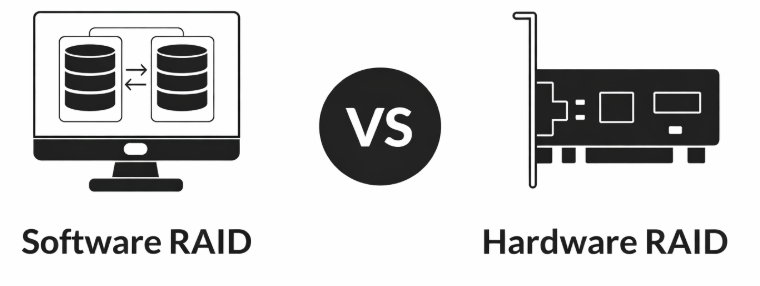
Software RAID vs Hardware RAID
Before configuring disks in the installer, it’s important to understand why Software RAID 1 is being used and how it compares to hardware-based alternatives. This helps avoid incorrect expectations and design mistakes.
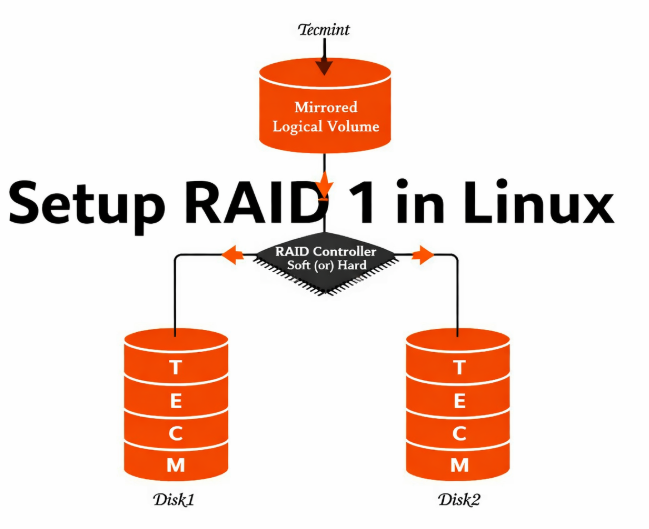
How Software RAID Works
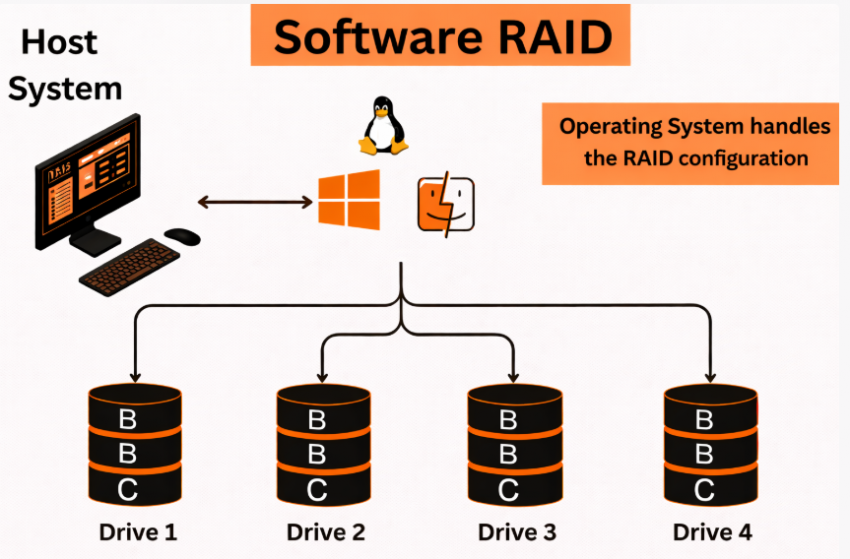
With Software RAID, disk mirroring is handled directly by the Linux kernel using mdadm. The operating system:
- Detects physical disks
- Combines them into RAID arrays (/dev/md*)
- Manages synchronization, monitoring, and recovery
There is no dependency on proprietary controllers. All RAID metadata is stored on the disks themselves, which makes the setup portable and transparent.
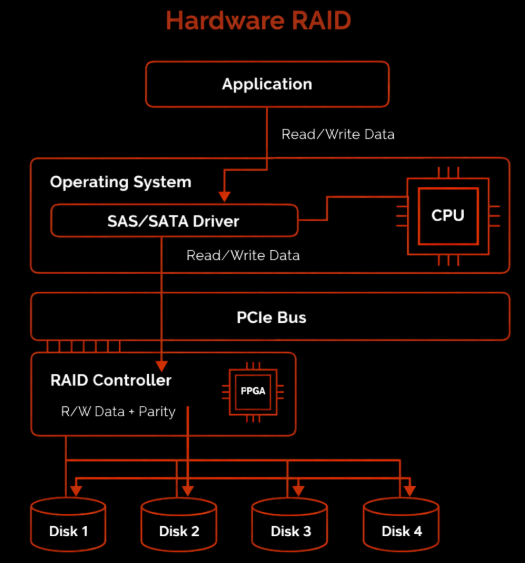
How Hardware RAID Works?
Hardware RAID uses a dedicated RAID controller that abstracts multiple disks into a single logical device. The operating system sees this as one disk and has no direct visibility into the individual drives.
This approach:
- Offloads RAID logic to the controller
- Requires vendor-specific firmware and tools
- Often hides disk-level details from the OS
If the controller fails, recovery may require identical replacement hardware.
| Aspect | Software RAID 1 | Hardware RAID 1 |
| Management | OS-level (mdadm) | Controller-level |
| Transparency | Full disk visibility | Abstracted |
| Portability | High (move disks between servers) | Limited |
| Vendor lock-in | None | Possible |
| Cost | No extra hardware | RAID controller required |
| Recovery | Standard Linux tools | Vendor-specific tools |
Why Software RAID 1 Is Often Preferred for System Disks?
For operating system disks, Software RAID 1 offers several practical advantages:
- GRUB and bootloader integration is predictable
- Disk failures are visible immediately to the OS
- Monitoring and alerts are easier to implement
- No single point of failure at the controller level
In dedicated server environments, Software RAID provides maximum control with minimal complexity, which is why it remains a standard choice.
When Hardware RAID May Make Sense?
Hardware RAID can still be appropriate when:
- Very high write performance is required
- A battery-backed cache is needed
- The environment is standardized around a specific controller model
- The RAID setup is managed externally by a hosting provider
However, for many system disk use cases, these benefits do not outweigh the added complexity and dependency.
Choosing the Right Approach
- Use Software RAID 1 when you want transparency, portability, and predictable recovery
- Use Hardware RAID when performance acceleration or controller-based caching is a strict requirement
- For most Ubuntu system disks on dedicated servers, Software RAID 1 is the safer and simpler choice
With this decision made, we can move on to the practical part: configuring disks during installation.
Manual Storage Layout
This section walks you through the critical installer steps required to create a correct Software RAID 1 configuration. Accuracy here determines whether the system will be bootable and fault-tolerant in real-world operation.
Step 1: Boot the Ubuntu Installer
Boot the server from your Ubuntu installation media (ISO via IPMI, virtual media, or physical drive).
Ubuntu Server is recommended because:
- It provides clearer RAID and storage controls
- It avoids desktop-specific abstractions
- It is better suited for server-grade deployments
Proceed through:
- Language selection
- Keyboard layout
- Network configuration
Stop when you reach the Storage configuration.
Do not select automatic disk layout.
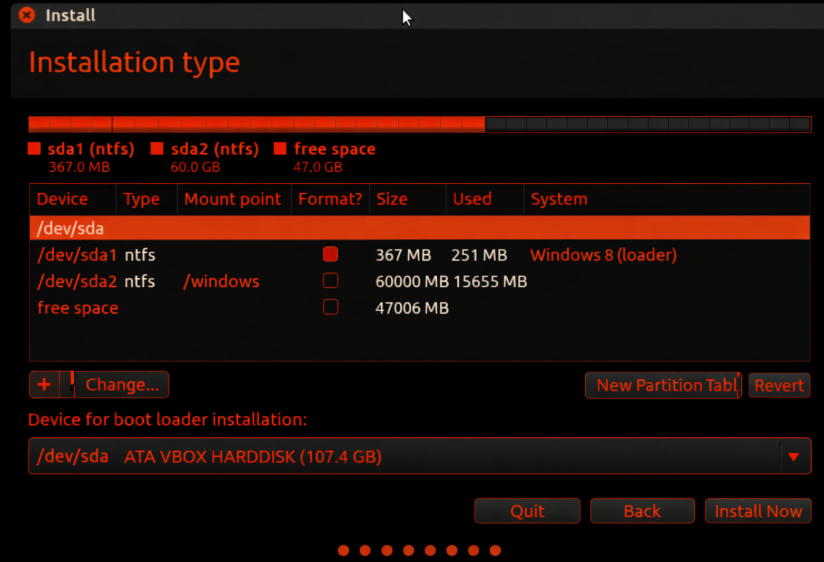
Step 2: Select Manual / Custom Storage Configuration
At the storage screen, choose:
- Custom storage layout
- or Something else (wording varies by version)
This option gives full control over:
- Disk partitioning
- RAID assignment
- Filesystem placement
Automatic layouts cannot ensure correct mirroring or reliable boot behavior.
Step 3: Clear Existing Disk Layouts (If Needed)
If the disks were previously used, remove any existing:
- Partitions
- RAID metadata
- Filesystems
Both disks should start in a clean, unallocated state.
Important:
- Clear both disks completely
- Do not mix old metadata with new RAID arrays
This prevents installer conflicts and RAID assembly errors.
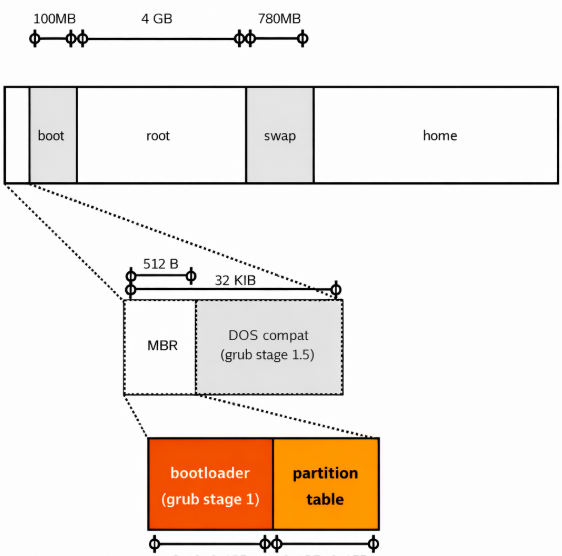
Step 4: Create Identical Partitions on Both Disks
You will now partition each disk separately, using the same sizes and structure.
Recommended example:
- Partition 1: /boot – 512 MB
- Partition 2: swap – 4 GB
- Partition 3: / – remaining space
For each partition:
- Set Use as: RAID
- Do not format
- Mark /boot partitions as bootable
Repeat the exact layout on both disks.
Symmetry is mandatory — RAID cannot mirror mismatched partitions.
Step 5: Verify Partition Symmetry
Before creating RAID arrays, confirm:
- Partition sizes match exactly
- Partition order is identical
- Both disks contain the same number of RAID partitions
Any mismatch at this stage will cause RAID creation to fail or behave unpredictably.
At this point, the physical disk preparation is complete.
In the next section, you will combine these partitions into Software RAID (md) devices and assign mount points.
Creating Software RAID (md Devices) and Assigning Mount Points
After preparing identical partitions on both disks, the next step is to combine them into Software RAID arrays and tell Ubuntu how to use them.
Step 6: Create Software RAID Arrays (mdadm)
In the storage configuration menu, select Create software RAID (md).
For each RAID array:
- Choose RAID level: RAID 1 (mirroring)
- Select the matching partitions from both disks
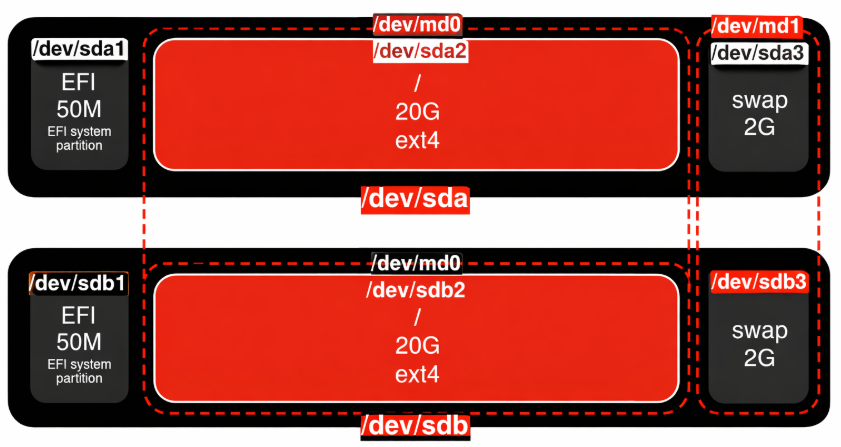
- Example: /dev/sda1 + /dev/sdb1
- Example: /dev/sda1 + /dev/sdb1
- Confirm the array creation
Repeat this process for each partition group:
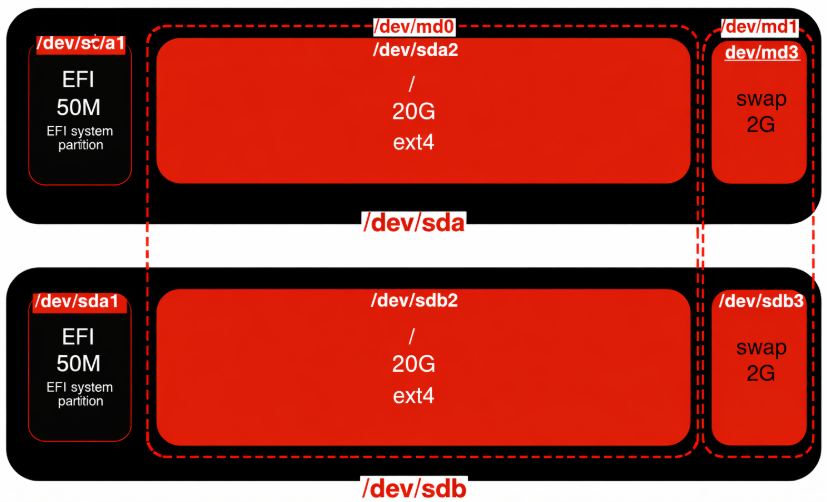
- /boot → md0
- swap → md1
- / (root) → md2
Each md device represents a virtual mirrored disk.
Step 7: Understand What md Devices Represent
Once created, the installer treats RAID arrays as normal block devices.
Important points:
- The OS never mounts /dev/sda or /dev/sdb directly
- All filesystems live on /dev/md*
- Disk failures are handled transparently by the RAID layer
This abstraction is what allows the system to keep running even if one physical disk fails.
Step 8: Assign Filesystems and Mount Points
Now configure each RAID device:
Typical setup:
- /dev/md0 → /boot → ext4
- /dev/md1 → swap → linux-swap
- /dev/md2 → / → ext4 or xfs
Guidelines:
- Format only the md devices
- Use stable, well-supported filesystems
- Avoid experimental filesystems for system disks
At this stage, Ubuntu knows exactly where and how the OS will be installed.
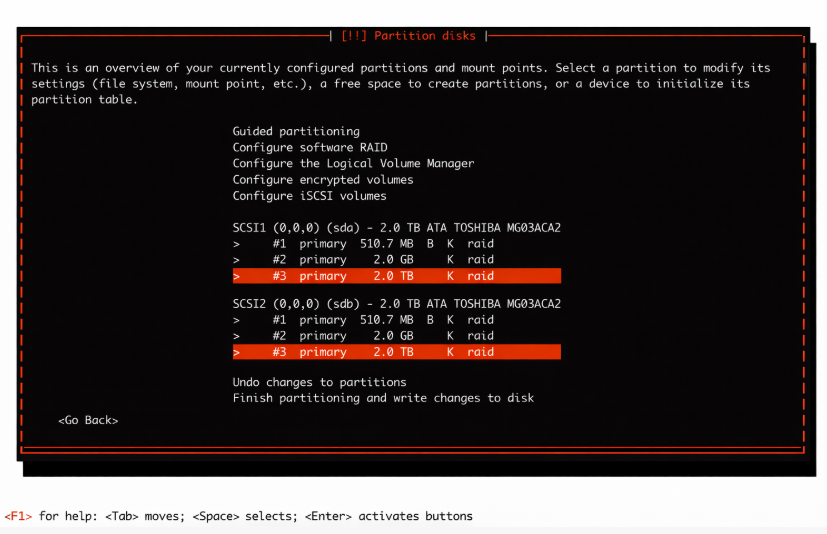
Step 9: Review the Final Storage Layout
Before continuing, carefully review the summary screen.
You should see:
- /boot, /, and swap mounted from /dev/md*
- No mount points directly referencing /dev/sda or /dev/sdb
- RAID level shown as RAID 1
If anything looks incorrect, go back and fix it now. Mistakes here will be costly to correct later.
Step 10: Proceed with Installation
Once the layout is correct:
- Confirm disk changes
- Allow the installer to format RAID devices
- Continue with OS installation
Ubuntu will install the system on mirrored storage, ensuring disk-level fault tolerance from first boot.
GRUB and Boot Reliability (Critical Step)
A Software RAID 1 setup is only truly fault-tolerant if the system can boot from either disk. This depends entirely on correct GRUB installation.
Why GRUB Configuration Matters?
RAID 1 mirrors data at the disk level, but the bootloader is not automatically redundant.
If GRUB is installed on only one disk:
- The system works normally
- RAID appears healthy
- A single disk failure can make the server unbootable
This is one of the most common real-world RAID mistakes.
How GRUB Works with Software RAID?
In a proper setup:
- Each disk has its own boot sector (BIOS) or EFI entry (UEFI)
- GRUB loads the kernel from a RAID-backed /boot
- The kernel assembles the RAID arrays and mounts /
This means:
- Either disk can start the boot process
- RAID assembly happens automatically
- The OS starts even if one disk is missing
Installing GRUB on Both Disks
After installation completes and the system boots for the first time, GRUB must be explicitly installed on each physical disk.
Conceptually:
- GRUB is written to /dev/sda
- GRUB is written to /dev/sdb
- Both point to the same RAID-backed /boot
This ensures that either disk can initiate boot.
BIOS vs UEFI Considerations
The exact mechanics differ slightly:
BIOS systems
- GRUB is installed into the MBR of each disk
- No EFI partition is required
UEFI systems
- Each disk must contain an EFI System Partition (ESP)
- EFI entries should exist for both disks
- The firmware can boot from either drive
Ignoring firmware mode leads to fragile boot setups.
Verifying Boot Redundancy
A correct setup ensures:
- The system boots with either disk disconnected
- RAID arrays assemble automatically
- No manual intervention is required
This verification step turns RAID from theoretical redundancy into real operational resilience.
Post-Installation Verification and Monitoring
Once Ubuntu has finished installing and GRUB is properly configured on both disks, the next step is to verify RAID health and ensure the system can detect and respond to disk failures.
Step 11: Verify RAID Status After First Boot
After logging into the system for the first time, confirm that all RAID arrays are active and synchronized.
At a conceptual level, you should verify that:
- All RAID devices (md) are assembled
- Each array is running in RAID 1 mode
- Both disks are active members of every array
This confirms that the kernel has correctly recognized and assembled the RAID configuration.
Step 12: Confirm Filesystems Are Mounted from RAID Devices
Next, ensure that the system is actually using RAID-backed storage.
What you should see conceptually:
- /boot mounted from /dev/md*
- / (root) mounted from /dev/md*
- No critical filesystem mounted directly from /dev/sda or /dev/sdb
If any core mount point bypasses RAID, redundancy is compromised.
Step 13: Enable RAID Monitoring and Alerts
A RAID array is only useful if disk failures are detected immediately.
Production systems should always have:
- Automatic RAID monitoring
- Clear alerts when a disk drops out
- Visibility into rebuild status
Monitoring allows administrators to replace failed hardware before redundancy is lost entirely.
Step 14: Understand Normal RAID 1 Behavior
Knowing what “normal” looks like helps identify problems quickly.
Normal RAID 1 behavior:
- Read operations may be served from either disk
- Write operations go to both disks
- One disk may temporarily lag during resync
- Performance remains stable during single-disk failure
Temporary degradation during rebuild is expected and normal.
Step 15: Perform a Basic Failure Readiness Check
Before considering the system production-ready, you should be confident that:
- RAID survives a single disk failure
- The system remains bootable
- Alerts are triggered correctly
Many administrators validate this by simulating a disk failure during maintenance windows.
This step transforms RAID from a configuration into a tested reliability mechanism.

What You’ve Achieved So Far
At this stage:
- Ubuntu is installed on mirrored storage
- The system can boot from either disk
- RAID health can be monitored
- Disk failures can be detected early
The final remaining topic is what to do when a disk actually fails and how to safely replace it without downtime.
Disk Failure and Replacement Procedure
Software RAID 1 is designed to keep your system running even when a disk fails. Knowing how to respond correctly ensures that redundancy is restored without data loss or unnecessary downtime.
What Happens When a Disk Fails?
When one disk fails:
- The RAID array switches to degraded mode
- All data remains accessible from the remaining disk
- The system continues running normally
- Performance may slightly degrade, but availability is preserved
RAID 1 prioritizes continuity of service, not immediate performance recovery.
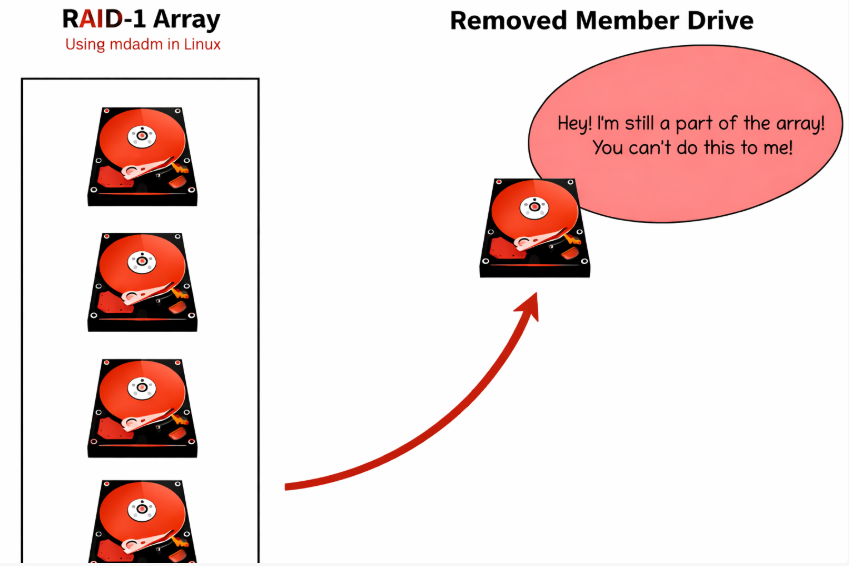
Identifying the Failed Disk
A failed or failing disk is typically detected by:
- RAID monitoring alerts
- System logs
- Degraded RAID status indicators
Correct identification is critical:
- Removing the wrong disk can cause total data loss
- Always verify the physical disk location before replacement
In professional environments, disks are labeled and mapped to their logical identifiers.
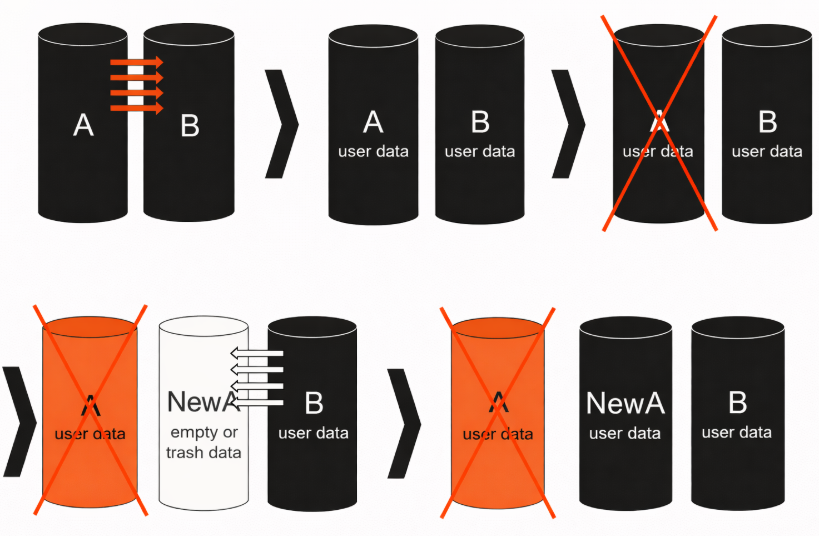
Replacing the Failed Disk
Once the failed disk is identified:
- Power down the server only if hot-swap is not supported
- Replace the failed drive with a disk of equal or larger size
- Ensure the new disk is detected by the system
The replacement disk must be clean and free of old RAID metadata.
Re-Adding the Disk to the RAID Array
After replacement:
- The new disk is added back into the RAID array
- RAID 1 begins resynchronization
- Data is copied from the healthy disk to the new one
During this process:
- The system remains online
- Performance may be temporarily reduced
- Rebuild time depends on disk size and speed
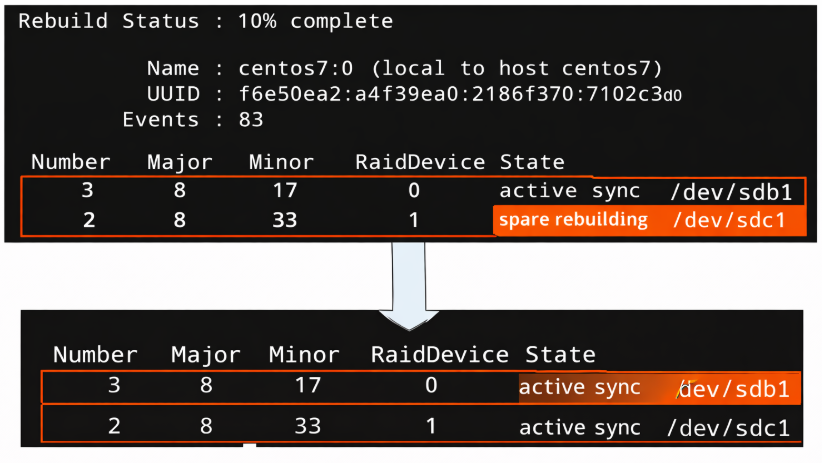
Monitoring the Rebuild Process
While rebuilding:
- Monitor progress regularly
- Avoid unnecessary system load
- Do not reboot unless absolutely required
A completed rebuild restores full redundancy.
Common Mistakes During Disk Replacement
Avoid these frequent errors:
- Replacing both disks at the same time
- Forgetting to reinstall GRUB on the new disk
- Using a smaller replacement disk
- Ignoring alerts after rebuild completion
Disk replacement is safe when done methodically and verified at each step.
Performance and Reliability Considerations
Software RAID 1 is often chosen for reliability, but it also has specific performance characteristics that should be understood before using it in production.
Read and Write Performance in RAID 1
RAID 1 mirrors data to two disks, which affects reads and writes differently.
Read behavior
- Read operations can be served from either disk
- The kernel may balance reads between disks
- In practice, read performance can improve slightly, especially on HDDs
Write behavior
- Every write must be committed to both disks
- Write speed is limited by the slower disk
- Latency is usually slightly higher than on a single disk
This makes RAID 1 ideal for system disks, where reliability matters more than maximum write throughput.
HDD vs SSD vs NVMe in Software RAID 1
The underlying storage type has a significant impact on RAID behavior.
HDD
- Clear reliability benefits
- Noticeable read improvements
- Rebuilds can take many hours on large disks
SSD
- Very low latency
- Fast rebuilds compared to HDDs
- Minimal performance penalty for mirroring
NVMe
- Extremely fast I/O
- Software RAID overhead is negligible
- Proper CPU and PCIe bandwidth are important
On modern servers, Software RAID 1 works efficiently even with high-speed NVMe drives.

What RAID 1 Improves
RAID 1 significantly improves availability, which is its primary goal.
It protects against:
- Single-disk hardware failure
- Read errors from failing drives
- Sudden disk disappearance
The system continues running while the failed disk is replaced and rebuilt.
What RAID 1 Does NOT Protect Against
It’s critical to understand the limits of RAID 1.
RAID 1 does not protect against:
- Accidental file deletion
- Filesystem corruption
- Malware or ransomware
- Misconfiguration or human error
- Simultaneous failure of both disks
RAID improves uptime, not data history. Backups are still mandatory.
Rebuild Impact and Operational Planning
During a RAID rebuild:
- Disk I/O increases significantly
- Performance may temporarily degrade
- Large disks require longer rebuild windows
Best practices:
- Monitor rebuild progress
- Avoid heavy write workloads during resync
- Replace failing disks early to reduce risk
Proper planning turns rebuilds into routine maintenance, not emergencies.
Alternatives to Software RAID 1
While Software RAID 1 is a reliable and widely used solution, it is not the only option. Depending on workload, hardware, and operational requirements, other approaches may be more suitable.
Software RAID 1 + LVM
A common enhancement to Software RAID is placing LVM (Logical Volume Manager) on top of RAID devices.
How it works:
- Physical disks → RAID 1 (md)
- RAID device → LVM volume group
- Logical volumes → filesystems
Advantages:
- Flexible resizing of volumes
- Easier snapshot management
- Clean separation between redundancy and volume layout
Trade-offs:
- Slightly increased complexity
- Requires disciplined volume management
This approach is popular on long-lived servers that may need storage reallocation over time.
ZFS Mirror
ZFS offers built-in redundancy through mirror vdevs, often compared directly to RAID 1.
Key characteristics:
- Integrated filesystem and volume manager
- End-to-end checksumming
- Automatic data integrity verification
Advantages:
- Strong protection against silent data corruption
- Advanced snapshot and replication features
Limitations:
- Higher memory usage
- More complex boot configuration
- Less forgiving of misconfiguration
ZFS mirrors are well-suited for storage-heavy or data-integrity–critical systems, but may be overkill for simple system disks.
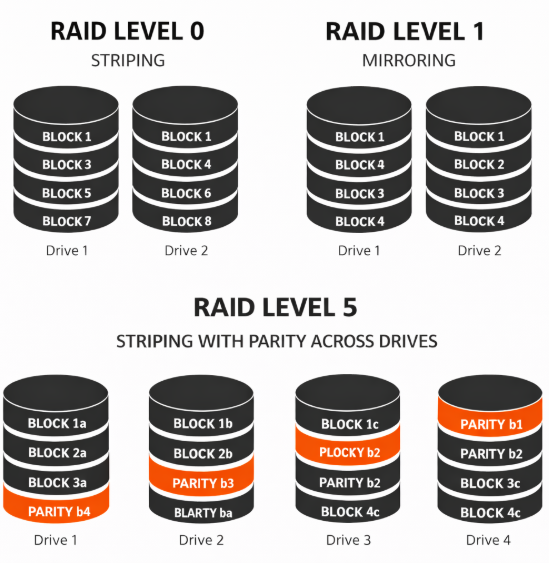
Hardware RAID 1
Hardware RAID uses a dedicated controller to manage disk mirroring.
Advantages:
- Offloads RAID logic from the CPU
- Can provide write caching with a battery-backed cache
- Single logical disk presented to the OS
Disadvantages:
- Controller becomes a single point of failure
- Recovery may require identical hardware
- Limited transparency and monitoring at the OS level
Hardware RAID is often used in standardized enterprise environments, but it reduces portability and visibility.
Cloud Block Storage and Managed Disks
In cloud environments, redundancy is typically handled by the provider.
Characteristics:
- Disk replication is handled outside the VM
- No direct control over physical disks
- Billing tied to usage and I/O
This model is fundamentally different from dedicated servers and does not replace the need for Software RAID in bare-metal deployments.
| Use Case | Recommended Option |
| Dedicated server system disk | Software RAID 1 |
| Flexible volume management | RAID 1 + LVM |
| Data integrity–critical storage | ZFS mirror |
| Enterprise controller-based setup | Hardware RAID |
| Cloud virtual machines | Managed block storage |
There is no universal solution the right choice depends on control requirements, failure tolerance, and operational maturity.
Build Reliability into Your Infrastructure from Day One
Software RAID 1 remains one of the most practical and reliable ways to protect system disks on Ubuntu, especially in dedicated and bare-metal environments. When designed correctly, it delivers predictable behavior, transparent recovery, and uninterrupted operation during disk failures.
However, as this guide shows, reliability is not achieved by clicking the right installer options alone. It comes from:
- Correct disk planning
- Symmetric partitioning
- Proper bootloader redundancy
- Continuous monitoring
- Tested recovery procedures
These details are what separate a working installation from a production-ready system.
In real infrastructure, disks will fail. The question is not if, but when. A correctly implemented Software RAID 1 setup ensures that failures remain routine maintenance events, not outages.
When You Need More Than a Tutorial
For growing projects, infrastructure decisions quickly go beyond a single server:
- Multiple dedicated servers
- Clustered workloads
- High-bandwidth connectivity
- Predictable performance and pricing
- Human-level support instead of automation-only responses
At this stage, the difference is no longer the technology itself, but how it is selected, deployed, and operated.
If you need:
- Dedicated servers designed for long-term stability
- RAID layouts validated in real production environments
- Hardware sourced, assembled, and supported as a single solution
- Direct access to engineers who understand failure scenarios
Then your infrastructure should be built by a team that operates it daily.


