
AI summary
The article provides a comprehensive guide on how to point a domain name to a dedicated server’s IP address, emphasizing the importance of understanding DNS functionality and server configuration. It clarifies that DNS primarily translates domain names into IP addresses and does not manage server software, website deployment, or SSL certificates. The piece outlines necessary preparations before making DNS changes, including confirming server readiness, identifying where DNS is managed, and ensuring proper web server configuration. It also discusses the significance of choosing the correct DNS records and the verification process to ensure both DNS and server configurations are functioning correctly. The article concludes by highlighting the need for careful planning and rollback strategies to mitigate potential issues during DNS changes.
How to Point Your Domain Name to a Dedicated Server’s IP Address?
Before changing any DNS records, it’s important to clearly understand what problem you are solving.
At Advanced Hosting, most DNS-related incidents we see are caused not by mistakes in records, but by incorrect expectations about what DNS is supposed to do.
This article removes those false assumptions before any practical steps begin.
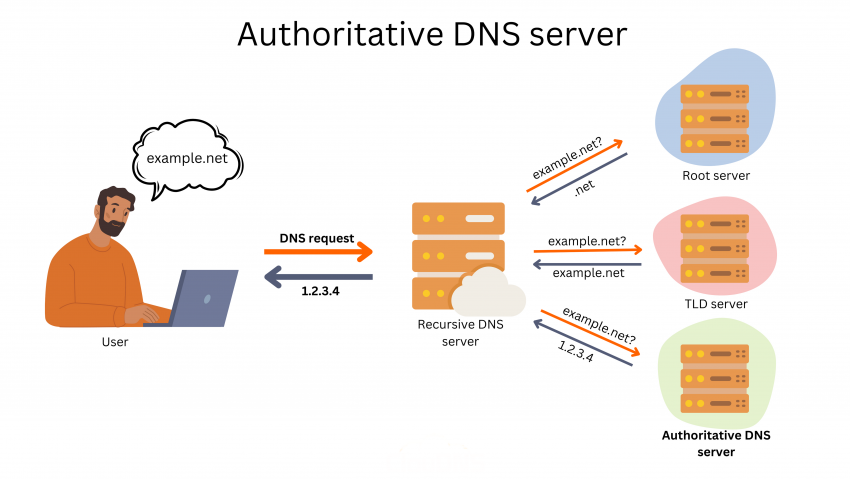
What DNS actually does:
DNS has one primary function:
Translate a domain name into an IP address.
That’s all.
When you create an A record or AAAA record, you are simply saying:
- example.com → 203.0.113.10 (IPv4).
- or → 2001:db8::10 (IPv6).
DNS does not care:
- What software runs on the server?
- whether a website exists.
- whether HTTPS is configured.
- whether the server is reachable on the required ports.
It only answers the question:
“Which IP address belongs to this name?”
What DNS does not do (common misconceptions)
A correctly configured DNS record does not:
❌ Deploy or install a website.
❌ Configure Nginx, Apache, or any web server.
❌ Open firewall ports.
❌ Issue or validate SSL certificates.
❌ Decide which site should respond to a request.
All of those responsibilities belong to the server and application layer, not DNS.
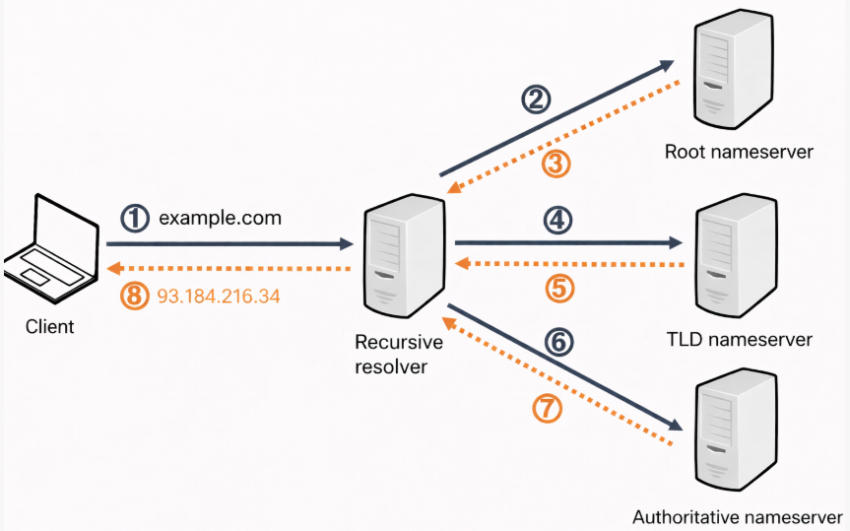
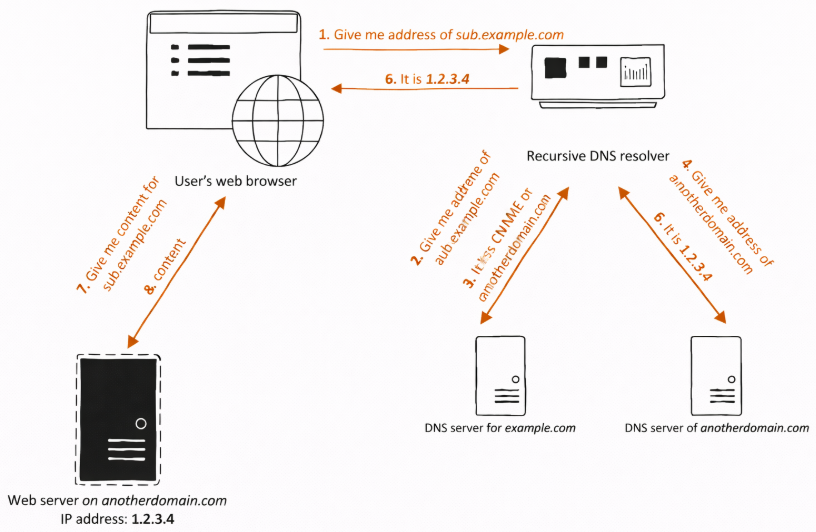
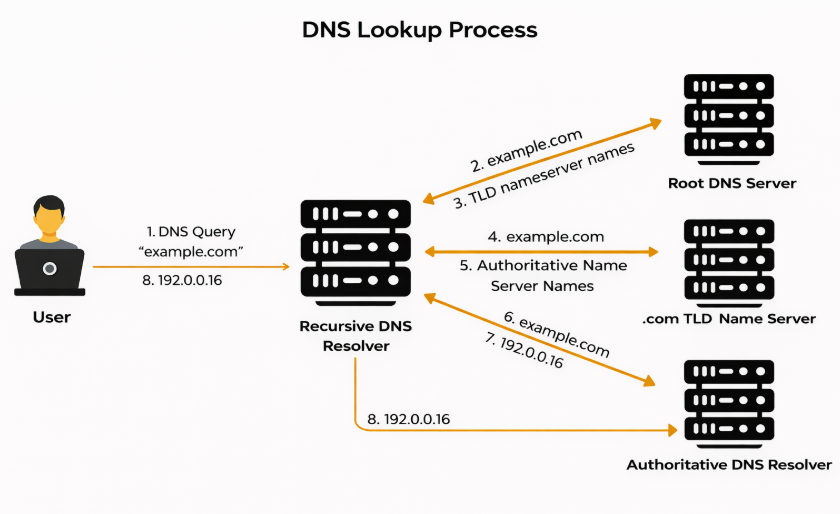
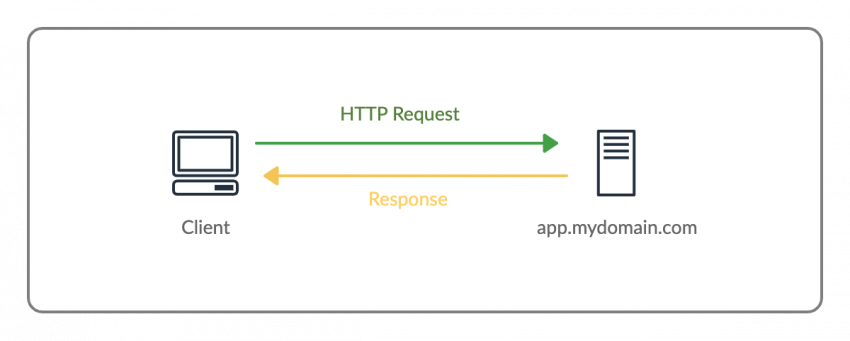
How does a browser request really flow?
To understand why DNS alone is never enough, it helps to see the full request chain.
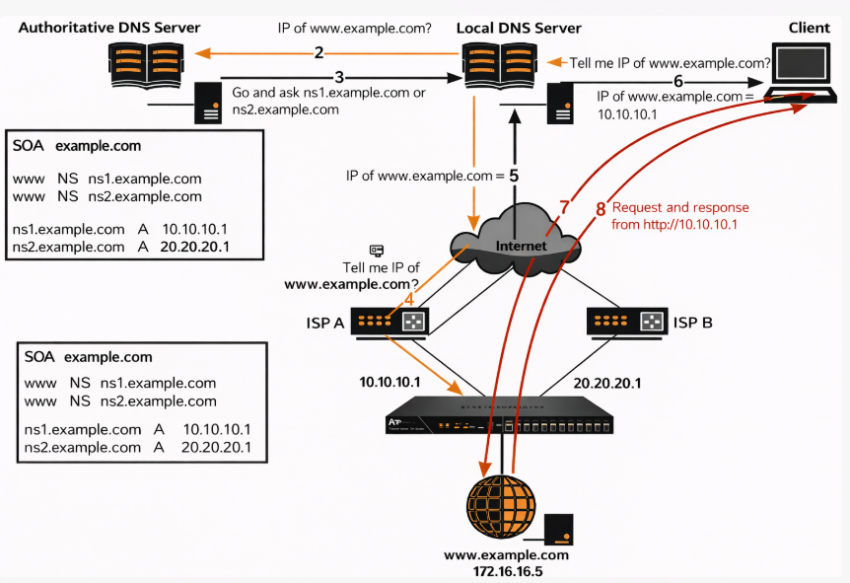
- Domain — User enters example.com in a browser.
- DNS — Domain is resolved to an IP address.
- IP — Browser connects to that IP.
- TCP — Network connection is established.
- HTTP / HTTPS — Web request is sent.
- Virtual host — Web server selects the correct site.
- Application — Website or service generates a response.
A failure at any step after DNS will result in a broken website, even if DNS is configured perfectly.
Why can “correct” while a website still fails?
This situation is extremely common on dedicated servers.
Typical examples:
- DNS points to the correct IP, but ports 80/443 are blocked.
- DNS resolves, but no virtual host exists for the domain.
- DNS works over IPv6, but the server listens only on IPv4.
- DNS is correct, but the SSL certificate does not match the domain.
In all these cases:
- DNS is doing its job.
- The server is not prepared to handle the request.
DNS success ≠ website success.
What Do You Need Before You Start?
Before changing any DNS records, both sides of the connection must be ready: the domain side (DNS control) and the server side (network and services). This stage is treated as mandatory, as skipping preparation is the fastest way to cause downtime even when the DNS changes themselves are correct.
1. Information you must have in advance
You cannot proceed safely without the following information:
Dedicated server details
- Public IPv4 address of the server.
- Public IPv6 address (only if you plan to use IPv6).
- Confirmation that the server is online and reachable.
Domain & DNS access
- Log in to your domain registrar or DNS provider.
- Knowledge of where DNS is actually managed (registrar vs external DNS).
- Permission to edit DNS records (A / AAAA / CNAME).
2. Confirm where your DNS is managed
This is a common failure point.
Your domain’s DNS is controlled by the authoritative name servers, not necessarily by the registrar where you bought the domain.
Typical scenarios:
- DNS managed at the registrar (default setup).
- DNS managed by an external provider (Cloudflare, Route 53, etc.).
- DNS is managed internally for corporate domains.
You must identify this before adding or editing records.
3. Make sure the server can accept traffic
DNS can route traffic correctly, and the website can still fail if the server is not ready.
Minimum server-side checks
- Web server (Nginx / Apache) is running
- Server listens on:
- 80/tcp (HTTP).
- 443/tcp (HTTPS).
- Firewall or security groups allow inbound connections.
- No IP-based restrictions block public access.
4. Prepare web server configuration for the domain
On a dedicated server, the web server must explicitly know which domain it should serve.
You should already have:
- A virtual host/server block is configured.
- The correct domain name is defined (for example: example.com, www.example.com).
- A default fallback is disabled or understood.
Without this:
- The server may respond with a default page.
- Or respond with nothing at all.
5. Decide on IPv4 vs IPv6 in advance
This decision affects DNS records directly.
- If your server fully supports IPv6 → you may add AAAA records.
- If IPv6 is partially configured or untested → do not add AAAA records yet.
Mixed or accidental IPv6 usage is a frequent cause of “site doesn’t open” issues.
💬 Advanced Hosting’s tip
If IPv6 is not intentional, don’t enable it “just in case”.
Browsers will prefer IPv6 when it exists.
6. Protect email and other services
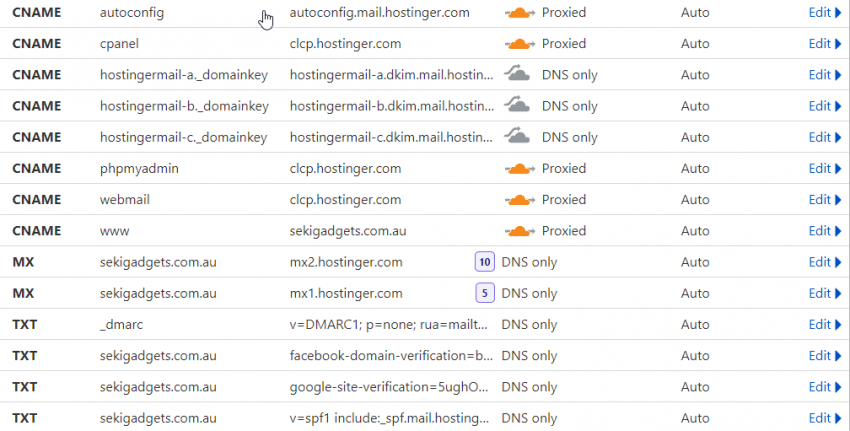
When editing DNS:
- Do not remove MX records.
- Do not delete TXT records (SPF, DKIM, verification).
- Only change records related to the website (A, AAAA, CNAME).
Email outages after DNS edits are almost always caused by accidental record deletion.
Preparation checklist (quick reference)
Before proceeding, confirm that:
- You know where DNS is managed.
- You have the correct server IP address(es).
- The server accepts HTTP/HTTPS traffic.
- The web server is configured for the domain.
- You understand whether IPv6 will be used.
- Email-related DNS records are untouched.
Decide the Correct DNS Record Strategy (A, AAAA, CNAME)
Before creating or editing any DNS records, you must decide which record types are actually appropriate for your setup. This decision directly affects availability, HTTPS behavior, and long-term maintainability.
DNS records are approached as routing rules rather than defaults copied from templates. The “correct” strategy depends on how the dedicated server is configured and how it is expected to scale.
Root domain vs subdomain: a critical distinction
DNS behaves differently for:
- Root domain → example.com
- Subdomains → www.example.com, api.example.com.
Understanding this distinction prevents many structural errors.
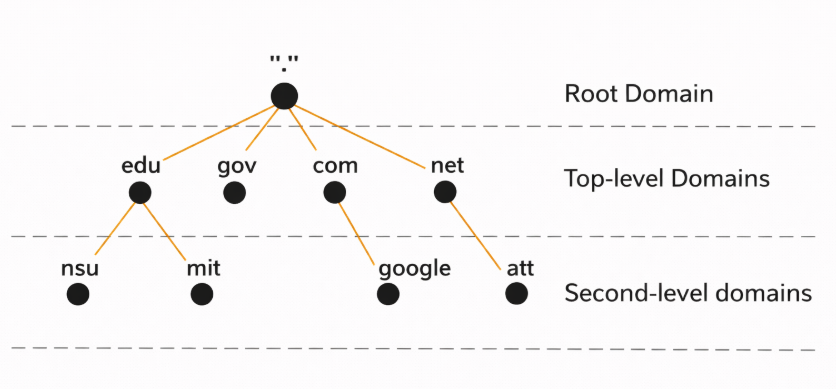
Root domain (example.com): what you can and cannot use
For the root domain, your options are limited by DNS standards.
A record (IPv4)
- Maps the domain directly to an IPv4 address.
- Required in almost all setups.
- Most predictable and universally supported.
Example:
example.com → 203.0.113.10
AAAA record (IPv6)
- Maps the domain to an IPv6 address.
- Optional, but only if IPv6 is fully configured end-to-end.
Example:
example.com → 2001:db8::10
❌ CNAME record (usually not allowed)
- Standard DNS does not allow a CNAME at the root.
- Some providers simulate this with ALIAS / ANAME records, but behavior varies.
Subdomain (www.example.com): flexible by design
Subdomains are where you gain real flexibility.
Option 1 — CNAME (recommended default)
- www.example.com → example.com.
- Single source of truth.
- Change the IP once at the root, and www follows automatically.
Best for:
- Most websites.
- Clean DNS management.
- Future IP changes or migrations.
Option 2 — A / AAAA records
- www.example.com → IP address directly
- More explicit, but duplicates the configuration.
Best for:
- Very strict DNS policies.
- Environments where CNAMEs are restricted.
A vs AAAA: IPv4 and IPv6 strategy
This choice must be intentional, not accidental.
When to add AAAA records
- IPv6 is fully configured on the server.
- Firewall rules allow IPv6 traffic.
- Web server listens on IPv6.
- SSL certificates include IPv6 paths.
When to avoid AAAA records
- IPv6 was never tested.
- Server listens only on IPv4.
- Network configuration is incomplete.
Browsers prefer IPv6 when available.
If IPv6 exists in DNS but fails on the server, users may experience timeouts even though IPv4 works.
Common DNS strategy mistakes to avoid
- Creating CNAME and A records for the same hostname.
- Adding AAAA records “just in case”.
- Pointing www and root to different IPs unintentionally.
- Leaving old records active during migration.
- Mixing test and production IPs in DNS.
Recommended baseline strategy
For a typical dedicated server setup:
- example.com
- A → IPv4.
- AAAA → only if IPv6 is ready.
- www.example.com
- CNAME → example.com.
This strategy is:
- Predictable
- Easy to maintain.
- Safe for future changes.
Where to Edit DNS Records (and When Not to Change Name Servers)?
Before adding or editing any DNS records, you must be certain where DNS for your domain is actually managed. This is one of the most common points of failure: users update records in the wrong control panel and assume nothing works.
This step is considered critical enough to verify before touching a single DNS record.
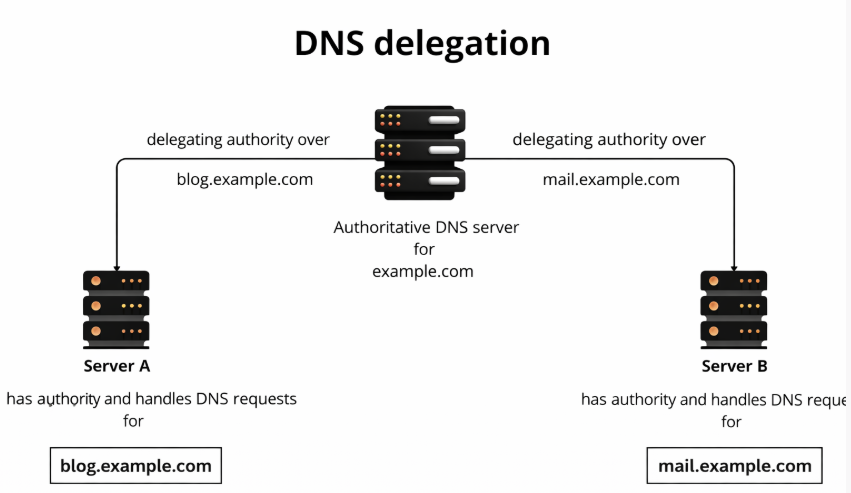
DNS is controlled by name servers, not by ownership
Buying a domain does not automatically mean DNS is managed at the registrar.
What controls DNS are the authoritative name servers (NS records) assigned to the domain.
If you edit DNS records:
❌ in a panel that is not authoritative.
❌ or in multiple panels at once.
Your changes will have no effect.
Step 1 — Identify the authoritative name servers
Every domain has a set of NS records that define where DNS is managed.
Typical outcomes:
- Registrar name servers (default setup).
- External DNS provider (Cloudflare, Route 53, etc.).
- Corporate or internal DNS infrastructure.
You must locate these name servers and use only that platform for DNS edits.
💬 Advanced Hosting tip
If DNS changes don’t propagate at all, you’re almost always editing the wrong DNS zone.
Step 2 — Two valid DNS management scenarios
Once you know the authoritative name servers, you’ll fall into one of these scenarios.
Scenario 1 — DNS managed at the registrar
This is the most common default.
Characteristics:
- DNS records are edited directly in the registrar’s control panel.
- No external DNS services involved.
- Simple, transparent behavior.
Best for:
- Small and medium projects.
- Direct, minimal setups.
- Environments without CDN or advanced routing.
Scenario 2 — DNS managed by an external provider
Here, the registrar delegates DNS control elsewhere.
Characteristics:
- Registrar only stores NS records.
- All DNS changes are made at the external provider.
- Often used with CDNs, Anycast DNS, or DDoS protection.
Best for:
- High-traffic projects.
- Multi-region infrastructure.
- Advanced traffic control.
When not to change name servers?
Many guides suggest:
“Just change name servers to your hosting provider.”
This is not always correct.
Changing name servers:
- Resets DNS control entirely.
- May break email, verification records, or integrations.
- Introduces propagation delays at the NS level.
- Couples DNS tightly with hosting (vendor lock-in).
Safe rule of thumb
- If DNS already works and you only need to point the website → do not change name servers.
- If you need advanced DNS features → plan a controlled NS migration separately.
DNS record edits and name server changes should never be mixed casually.
Step-by-Step: Create DNS Records Correctly
Once you know where DNS is managed and which record strategy you’ve chosen, you can move to execution. This is the point where most guides jump straight in, but here we do it methodically, so the result is predictable and reversible.
It is recommended to make DNS changes in small, controlled steps, especially on production domains.
Step 1 — Create an A record for the root domain
The root domain (example.com) is the foundation. Everything else depends on it.
What you are configuring
You are explicitly telling DNS:
Requests for example.com must be routed to this IPv4 address.
Typical A record values
- Type: A.
- Host / Name: @ (or empty — depends on DNS provider).
- Value / Points to: 203.0.113.10 (your server’s IPv4).
- TTL: 300–3600 seconds.
Step 2 — Add an AAAA record (only if IPv6 is ready)
This step is optional, not mandatory.
Add an AAAA record only if:
- IPv6 is configured on the server.
- Firewall allows IPv6 traffic.
- Web server listens on IPv6.
- SSL certificates work over IPv6.
Typical AAAA record values
- Type: AAAA.
- Host / Name: @.
- Value: 2001:db8::10.
- TTL: 300–3600 seconds.
Step 3 — Configure the www subdomain
Now decide how www.example.com should behave.
Option A — CNAME (recommended)
This is the cleanest and safest approach for most websites.
- Type: CNAME.
- Host / Name: www.
- Value / Target: example.com.
- TTL: 300–3600 seconds.
Result:
www.example.com → example.com → IP
Option B — A / AAAA records for www
Use this only if CNAMEs are restricted by policy.
- www → same IPv4 as root.
- Optional www → same IPv6 as root.
This approach works, but duplicates the configuration.
Step 4 — Remove conflicting DNS records
Before saving changes, check for conflicts.
Conflicts that must be removed
- Existing A record pointing to old hosting.
- Existing CNAME for the same hostname.
- Parking or redirecting records.
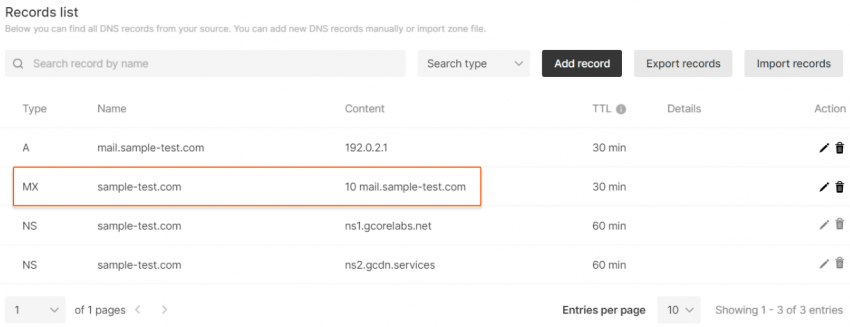
Records you must not touch
- MX (email).
- TXT (SPF, DKIM, verification).
- Other unrelated subdomains.
Step 5 — Save changes and note the timestamp
After saving:
- Record the time of change.
- Note the TTL values.
- Avoid making additional edits until verification.
Multiple edits during propagation make troubleshooting harder.
What should you have after this section?
At this point:
- Root domain points to your dedicated server.
- www is correctly aligned.
- No conflicting records remain.
- Email and auxiliary services are untouched.
DNS is now configured but not yet verified.
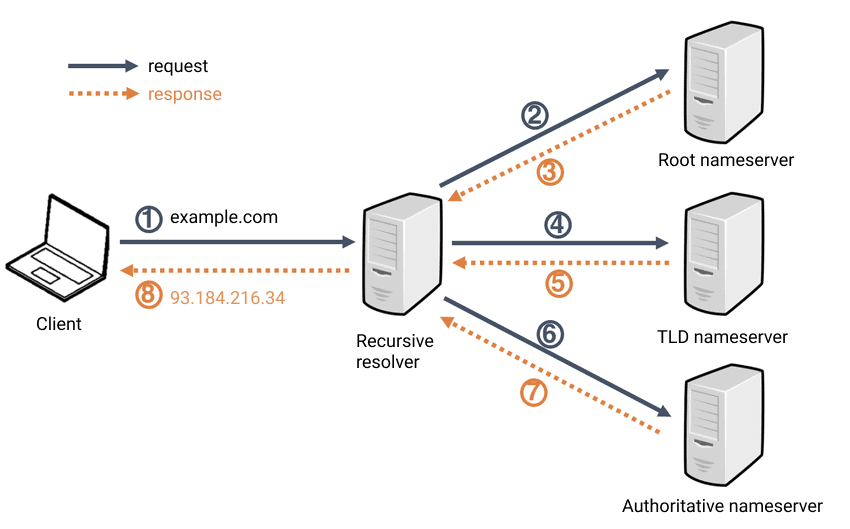
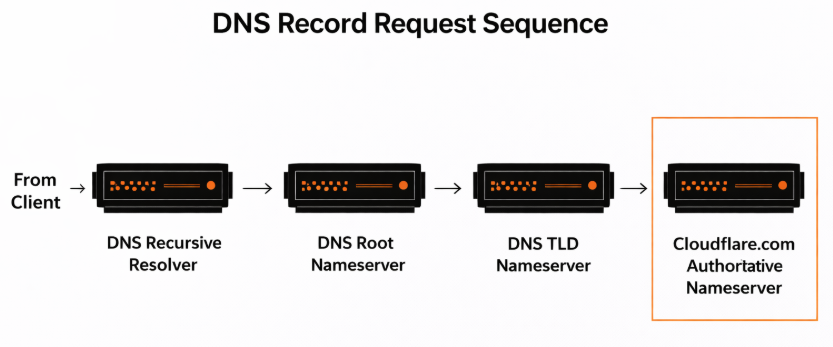
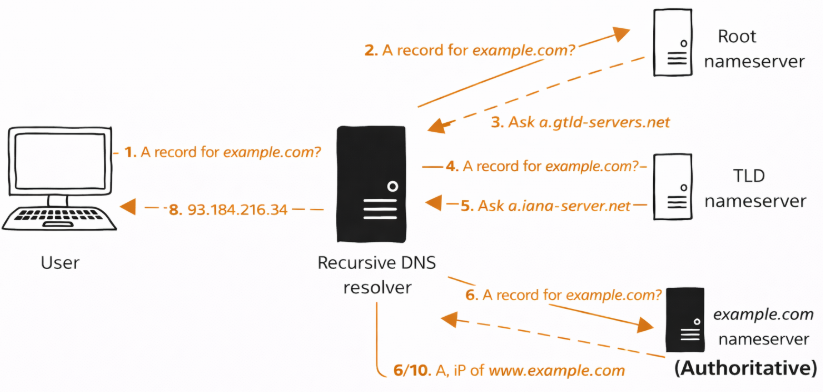
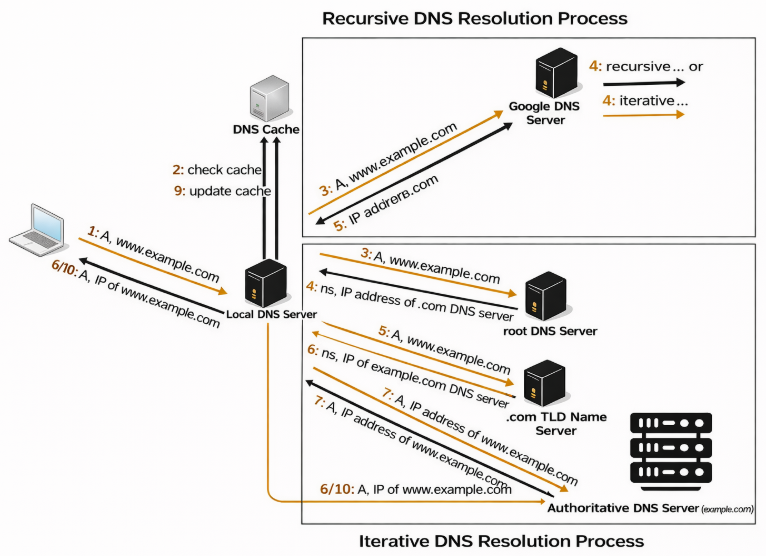
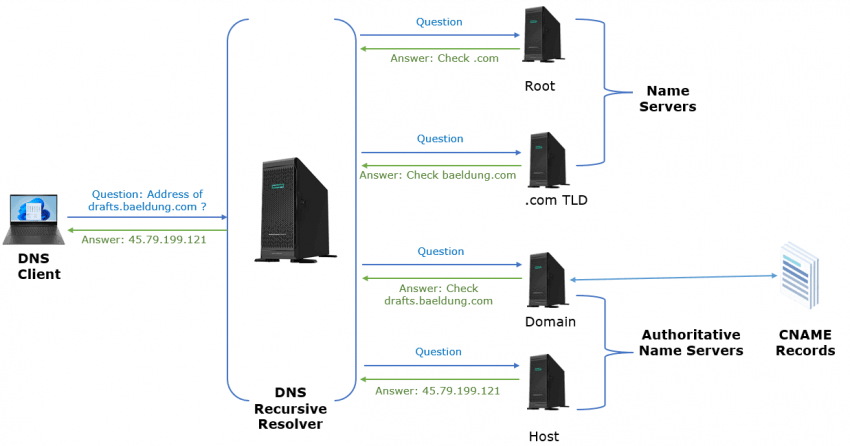
What Actually Happens After You Save Changes?
After DNS records are created or modified, many guides simply say “wait up to 48 hours. This advice is technically vague and operationally unhelpful. To manage DNS changes properly, you need to understand what propagates, what doesn’t, and what you can control.
What does “DNS propagation” really mean?
DNS propagation is not a single global event.
It is the process of DNS caches being refreshed across the Internet.
Every resolver:
- Stores DNS answers temporarily.
- Respects the TTL (Time To Live) value.
- Refreshes records independently.
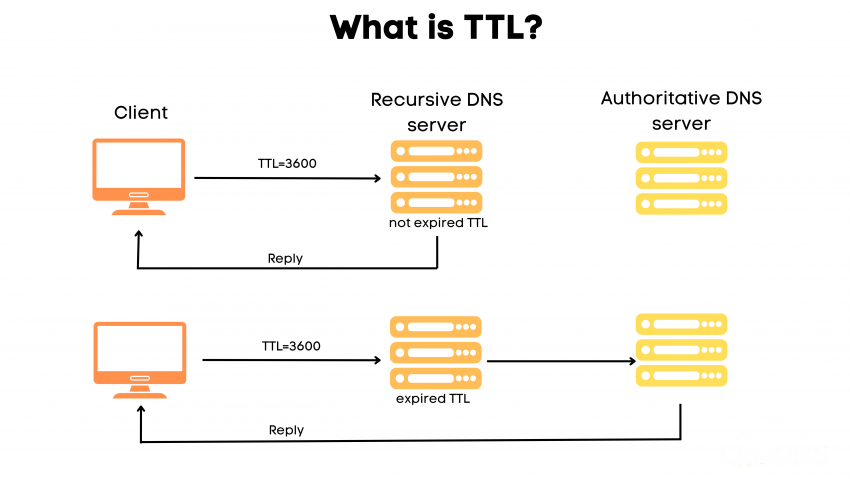
When you update a DNS record:
- New resolvers see the change immediately.
- Cached resolvers keep the old value until TTL expires.
Why is “up to 48 hours” misleading?
In modern DNS environments:
- Most changes propagate within minutes to a few hours
- Long delays usually indicate:
- High TTL values set earlier.
- ISP-level caching.
- Incorrect DNS location (wrong name servers).
Waiting blindly for 48 hours often hides configuration mistakes.
What can you and cannot you control?
You can control:
- TTL values before making changes.
- Which records are edited?
- Whether multiple edits are made during propagation.
You cannot control:
- External resolver cache behavior.
- ISP DNS policies.
- User-side caching.
This is why planning DNS changes matters.
Recommended TTL strategy
For migrations or first setup
- Set TTL to 300 seconds (5 minutes).
- Wait for old TTLs to expire.
- Apply DNS changes.
For stable production
- Increase TTL to 1800–3600 seconds.
- Reduce query load.
- Improve resolver efficiency.
Why do repeated edits cause confusion?
Every DNS edit:
- Resets cache behavior.
- Introduces multiple states across resolvers.
- Makes verification unreliable.
If DNS is changed repeatedly during propagation:
- Some users hit old IPs.
- Others hit new IPs.
- Logs become inconsistent.
What propagation does not validate?
Even after propagation completes:
- It does not confirm server availability.
- It does not confirm that HTTPS works.
- It does not confirm application routing.
Propagation only confirms that DNS answers are updated.
Verify DNS Resolution Correctly
Once DNS records are saved and enough time has passed for caches to refresh, the next step is verification. This is where many guides make a critical mistake: they verify the wrong layer and assume success.
DNS verification is always kept separate from server and application verification, as each step proves something different.
What DNS verification actually proves?
DNS checks answer only one question:
Does this domain resolve to the expected IP address?
They do not prove:
- That the server is reachable.
- That the website works.
- That HTTPS is configured correctly.
Understanding this prevents false positives.
Step 1 — Verify A and AAAA records
Start by checking what IP addresses DNS returns.
You should verify:
- Root domain (example.com).
- www subdomain (if used).
Expected result:
- The IPs returned match your dedicated server.
What this confirms
- The DNS zone is updated.
- Propagation has reached the resolver you are querying.
What this does not confirm
- Network connectivity.
- Web server response.
- HTTPS availability.
💬 Advanced Hosting tip
If DNS resolves to the correct IP, DNS is finished.
Any remaining issues are outside DNS.
Step 2 — Verify CNAME resolution (if used)
If www is configured as a CNAME:
- It must resolve to the root domain.
- The root domain must then resolve to the IP.
This two-step resolution must be intact.
If CNAME resolution fails:www may not work even if the root domain does.
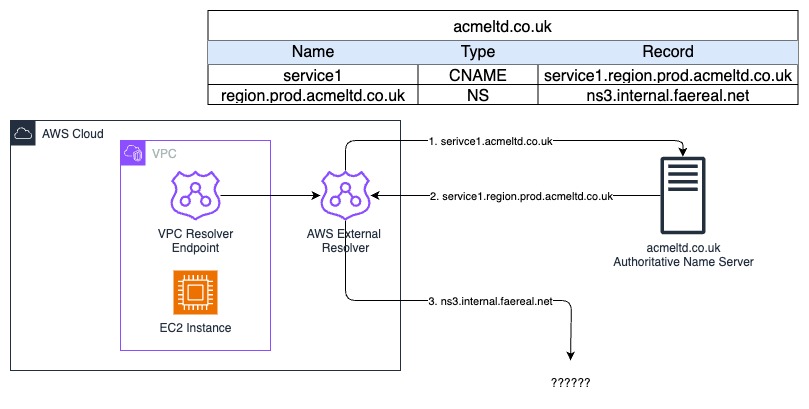
Step 3 — Check authoritative responses
If results differ across tools:
- Query authoritative name servers directly.
- This confirms what DNS should return globally.
Discrepancies usually indicate:
- Resolver caching.
- Split-horizon DNS.
- Edits made in the wrong DNS zone.
Common verification mistakes
Avoid these assumptions:
- “ping works, so the website should work.
- “DNS tool shows green, so everything is fine.
- “One resolver works, so all users are fine.
ICMP, DNS, TCP, and HTTP are different layers.
What to do if DNS verification fails?
If DNS does not return the expected IP:
- Recheck which name servers are authoritative.
- Confirm record values and hostnames.
- Wait for TTL to expire if recently changed.
Do not:
- Add duplicate records.
- Change name servers impulsively.
- Make multiple edits at once.
Once DNS is verified, the next step is to ensure the server actually responds to the domain.
Make Sure the Server Responds to the Domain
After DNS is verified, many users expect the website to work automatically. On a dedicated server, this is never guaranteed. DNS only brings traffic to the server’s IP. It does not tell the server how to handle that traffic.
Server-side validation is considered just as important as DNS configuration.
Why does DNS success not mean server success?
A dedicated server can:
- Receive traffic on the correct IP.
- And still return:
- No response.
- A default page.
- A wrong website.
- An SSL error.
This happens because the server must explicitly recognize the domain name sent in the request.
Step 1 — Confirm the web server is running and reachable
Before looking at domain-specific configuration, verify the basics.
Minimum requirements:
- The web server (Nginx/Apache) is running.
- Server listens on:
- 80/tcp for HTTP.
- 443/tcp for HTTPS.
- Firewall or security groups allow inbound connections.
If these conditions are not met, no DNS configuration will be effective.
Step 2 — Configure virtual hosts/server blocks correctly
Web servers use the Host header to decide which site should answer.
Your configuration must include:
- The exact domain name (example.com).
- The www variant is used.
- A defined document root or application handler.
Without this:
- The server may respond with a default site.
- Or respond with nothing.
Step 3 — Align HTTP and HTTPS behavior
If HTTPS is enabled:
- The SSL certificate must match the domain name
- The certificate must include:
- Root domain.
- www (if used).
Common failure scenario:
- DNS works.
- HTTP works.
- HTTPS fails due to a certificate mismatch.
💬 Advanced Hosting’s tip
DNS does not validate certificates.
HTTPS failures are almost always a server configuration issue.
Step 4 — IPv4 and IPv6 must behave consistently
If AAAA records exist:
- The server must listen on IPv6.
- Firewall rules must allow IPv6 traffic.
- Certificates must work over IPv6.
If IPv6 is broken:
- Browsers may never fall back to IPv4.
- Users experience timeouts despite working with IPv4.
Step 5 — Confirm traffic reaches the server
The most reliable confirmation:
- Server access logs show requests for the domain.
- Requests include the correct Host header.
This proves:
- DNS is correct.
- Network routing works.
- The server receives real traffic.
Common server-side failure patterns
- Correct DNS, wrong virtual host.
- Open port 80, closed port 443.
- SSL certificate missing www.
- IPv6 DNS enabled, IPv6 server disabled.
These are infrastructure issues, not DNS problems.
Once the server responds correctly, the final step is end-user validation.
Confirm the Website Works for Real Users
Once DNS resolves correctly and the server responds to the domain, the final step is to confirm that the website behaves as expected from an end-user perspective. This is the layer where technical correctness meets real-world experience.
Application-level validation is treated as mandatory before any DNS change is considered “finished.”
What application-level validation proves?
This stage confirms that:
- Users can reach the website via the domain name.
- The correct site or application is served.
- HTTP and HTTPS behave as intended.
- No redirects, certificate errors, or unexpected content appear.
Unlike DNS checks, this validation happens through the browser and application stack.
Step 1 — Test the domain in a browser
Open the domain in a clean browser session:
- http://example.com.
- https://example.com.
- https://www.example.com (if used).
What to check:
- Page loads without errors.
- Correct content appears.
- Redirects behave as expected (HTTP → HTTPS, www → root or vice versa).
Step 2 — Verify HTTPS behavior carefully
HTTPS introduces additional failure points.
Confirm that:
- The SSL certificate matches the domain.
- No browser security warnings appear.
- The certificate covers all served hostnames.
Common problems:
- Certificate issued only for the root domain.
- www is not included in the certificate.
- Old certificate still in use.
Step 3 — Check application and access logs
Server logs are your most reliable confirmation.
What to look for:
- Incoming requests for the correct domain.
- Correct HTTP status codes (200, 301, 302).
- No repeated connection or application errors.
This confirms that:
- Traffic reaches the server.
- The correct virtual host handles requests.
- The application responds successfully.
Step 4 — Validate behavior from different locations
DNS and routing can differ by geography.
Recommended checks:
- Test from a different network.
- Use a VPN or mobile connection.
- Verify behavior outside your local environment.
This helps identify:
- Regional caching issues.
- Partial propagation.
- Network-specific problems.
Step 5 — Confirm dependent services still work
After DNS changes, ensure that:
- Email continues to function.
- APIs or subdomains still resolve.
- Third-party integrations are unaffected.
These checks prevent silent failures that appear later.
Common Failure Scenarios and How to Fix Them
Even when DNS records look correct and the server is reachable, issues can still appear. In practice, most problems fall into a small set of recurring patterns. Knowing these patterns allows you to diagnose and fix issues quickly, without random trial-and-error.
These scenarios account for the majority of DNS-related support cases on dedicated servers.
Scenario 1 — DNS resolves, but the website doesn’t load
Symptoms
- DNS tools return the correct IP.
- The browser shows a timeout or connection error.
- No content is displayed.
Most likely causes
- Firewall blocks ports 80/443.
- The web server is not running.
- The server listens only on IPv4 while DNS returns IPv6.
How to fix
- Verify inbound rules for HTTP/HTTPS.
- Confirm the web server process is active.
- Remove AAAA records if IPv6 is not fully configured.
Scenario 2 — Root domain works, but www does not
Symptoms
- example.com opens correctly.
- www.example.com fails or shows a different page.
Most likely causes
- Missing CNAME or A record for www.
- www is not included in the web server configuration.
- The SSL certificate does not cover www.
How to fix
- Add a CNAME pointing www to the root domain.
- Update the web server to handle both hostnames.
- Reissue the SSL certificate with both names.
Scenario 3 — HTTPS fails after DNS change
Symptoms
- HTTP works.
- HTTPS shows a certificate warning or fails to connect.
Most likely causes
- Certificate issued before DNS pointed to the server.
- The certificate does not include all hostnames.
- Old certificate still cached or referenced.
How to fix
- Reissue or renew the SSL certificate.
- Confirm certificate covers root and www.
- Reload web server configuration.
Scenario 4 — Website works, but email stopped working
Symptoms
- Website loads correctly.
- Email sending or receiving fails.
Most likely causes
- MX records were removed or modified.
- TXT records (SPF, DKIM) were deleted accidentally.
- Name servers were changed without recreating email records.
How to fix
- Restore original MX and TXT records.
- Verify email routing configuration.
- Avoid mixing website DNS edits with email changes.
Scenario 5 — Some users see the new site, others don’t
Symptoms
- Website works for you.
- Other users still see old content.
Most likely causes
- DNS propagation is still in progress.
- High TTL values cached by ISPs.
- CDN or proxy caching old IPs.
How to fix
- Wait for TTL to expire.
- Avoid making additional DNS changes.
- Verify authoritative DNS responses.
💬 Advanced Hosting’s tip
Mixed results usually mean caching is not broken DNS.
Time and consistency resolve this, not more edits.
How to Roll Back or Migrate DNS Changes Safely?
DNS changes should always be made with the assumption that a rollback may be required. Even with careful preparation, unexpected behavior can occur due to caching, external dependencies, or overlooked configuration details.
Every DNS change is handled as a controlled operation rather than a one-way action.
Why rollback planning matters?
Without a rollback plan:
- Fixing mistakes takes longer.
- Downtime increases.
- Troubleshooting becomes chaotic.
With a rollback plan:
- Changes are reversible.
- Production risk is minimized.
- Troubleshooting stays structured.
Step 1 — Lower TTL before making changes
TTL controls how long DNS responses are cached.
Best practice
- Reduce TTL to 300 seconds at least one TTL cycle before the change.
- Wait until the old TTL expires.
- Then apply DNS updates.
This ensures:
- Fast rollback if needed.
- Minimal user impact.
💬 Advanced Hosting’s tip
TTL must be lowered before the change, not after.
Lowering it afterward does nothing for already cached records.
Step 2 — Keep old values documented
Before editing DNS:
- Record current A / AAAA / CNAME values.
- Note existing TTLs.
- Save screenshots or exports.
This makes rollback:
- Accurate.
- Immediate.
- Error-free.
Step 3 — Change one thing at a time
Avoid:
- Changing multiple records simultaneously.
- Mixing DNS changes with server reconfiguration.
- Editing name servers and records together.
A single, isolated change:
- Is easier to verify.
- Is easier to undo.
Step 4 — Validate before committing fully
After the change:
- Verify DNS resolution.
- Verify server response.
- Verify application behavior.
Only when all checks pass:
- Increase TTL back to stable values.
- Consider the change complete.
Step 5 — How to roll back quickly if needed
If something goes wrong:
- Restore the previous DNS values.
- Keep TTL low.
- Verify resolution and access.
- Investigate offline.
Rollback should be:
- Immediate.
- Controlled.
- Non-destructive.
💬 Advanced Hosting’s tip
A good DNS change is one you can undo in minutes.
Planning safe migrations between servers
When moving from one server to another:
- Prepare the new server fully.
- Test it using temporary hostnames or direct IP access.
- Switch DNS only after validation.
- Keep the old server running during transition.
This prevents:
- Data loss.
- Partial outages.
- Emergency rollbacks.
Key Takeaways
Pointing a domain name to a dedicated server’s IP address is not a single action, but a sequence of clearly defined steps across multiple layers. When those layers are understood and handled separately, the process becomes predictable and safe.
Drawing from hand-on experience at Advanced Hosting, we have identified the following core principles:
1. DNS solves only one problem
DNS exists to:
- Translate a domain name into an IP address
DNS does not:
- Configure your server.
- Deploy a website.
- Open network ports.
- Manage SSL certificates.
Treat DNS as routing, not as a setup.
2. Dedicated servers require explicit configuration
With a dedicated server:
- Nothing is automated by default.
- Web servers must explicitly handle domains.
- Firewalls must explicitly allow traffic.
- HTTPS must be configured intentionally.
This control is an advantage but only when used consciously.
3. Record strategy matters
Choosing the correct DNS records prevents future issues:
- Use A records for root domains.
- Add AAAA records only if IPv6 is fully ready.
- Use CNAME for www unless there is a clear reason not to.
- Avoid conflicting or duplicate records.
4. Verification must happen at multiple layers
A complete setup is verified by:
- DNS resolution checks.
- Server reachability.
- Web server response.
- Application behavior in the browser.
Skipping layers leads to false confidence.
5. DNS changes must be planned and reversible
Professional DNS management always includes:
- TTL planning.
- Documentation of previous values.
- One change at a time.
- A clear rollback path.
When you understand where DNS ends and where server responsibility begins, pointing a domain to a dedicated server becomes a controlled engineering task, not a guessing game.
If you apply the principles from this guide, you’ll avoid the most common pitfalls and gain full control over how your infrastructure behaves in production.


